Friday, September 2, 2011

Streets we've called home

I got thus idea after seeing signs at stores that had the steer names of different major cities.. I thought it would be a good idea to do o e of all the streets my husband and I have lived on. Here is the result even though its not perfect.... I like it :) 


Thursday, September 1, 2011

Wheeland Brothers - Just Take it Easy


The latest discovery... One of these guys used to be the roommate of a guy that I went to highschool with... I think I'm in love.... with the music ;) ( I'm happily married thank you)... The vibe and the lyrics of this song just make me feel giddy inside. I really miss California and this song really makes me feel like i am sitting there on the beach with these guys just relaxing and admiring their music. This video has made me a huge fan. I Love them and their Jack Johnsonish vibe.

Tuesday, August 30, 2011

The latest

My husband probably doesn't understand why I am constantly changing up the house, but he ultimately loves the majority of projects that I do around the house.  Here is the latest... :) painted on wall paper (sorry for the blurry picture.. it was taken with my camera phone)


My inspiration... officeentrynew
from Jones design company.. I LOVE this blog, and I loved the idea... even though mine didnt turn out as neat, i still like that it adds character to one of the walls in my office.. next time I will have to take my time with it.. i think i was just too excited to get it done that come of my lines didnt turn out quite perfect.. but i still like it. :)

Friday, July 29, 2011

Furniture Revamp

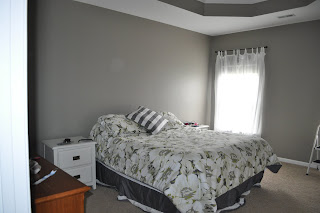
When my husband and I purchased our first home we received a bedroom set from my in-laws.  It is a very nice queen bedroom set with a dresser and armour.  We parted with the bed in '06 by placing it in our spare bedroom after we received a Cal King mattress from my parents.  Just this year we finally decided to make our bedroom look like a 'grown up' room by purchasing matching furniture.  We bought a 4-post bed and dresser from Thomasville.. I am in love with it.  It is all black with a slight distressing to it.  (This is the bed except ours has 4 tall posts)


Instead of purchasing new end tables and armour I decided to just go ahead and paint what we already had.
I started off by picking out the color of paint that I liked.. I decided to paint the end tables an off white to offset the bed,  and the armour black to match the rest of the furniture.


I started off by applying liquid sander to all the pieces of furniture.  With the end tables I primed before painting (only b/c the original finish seemed to be a little glossier than that of the armour), but with the armour I bought paint with primer already in it.. (it made the process go faster since I was able to 'skip' a step w/o actually skipping it).. I waited a few hours in-between coats just to make sure that all the paint was nice and dry before I reapplied a second coat.
sorry for the horrible picture... I snapped it quickly and didn't edit before posting... but you can get the gist of what it looks like.

This is the old dresser that was in our room... It now sits in the hallway and is being used for some extra storage to hold sheets, towels, etc.  

Overall I am very happy with how the pieces turned out.  We now have 4 new pieces of furniture...Not bad for about $40.00.


Tuesday, July 5, 2011

Day after the 4th.... no burnt fingers or hair (thank the Lord!)


This year my husband and I decided to take on hosting duties for our 'hood's' neighborhood party.  Even though it wasn't the entire neighborhood, we still had about 50 people here at our house.  The day started with a visit to church (to pray to the Lord that everything turn out OK), then breakfast, then back to the house to start the decorating and cooking.  I had several ideas leading up to the party on things that I wanted to do.. I wanted to make lemonade cupcakes, chicken BBQ sandwiches as well as broccoli slaw and regular coleslaw.  Everything came out great except for some slightly burnt cupcakes.
I am happy to say though, that the one thing  I was most nervous about, the pulled chicken BBQ turned out better than i thought it would.   I threw it in the crock pot at 8am and took it out at 3pm, just before the party... It was a HUGE success.. I have to give full credit to the Famous Daves Rich n Sassy BBQ sauce for giving it such amazing flavor.  It is my ultimate favorite BBQ sauce, and it really did make the chicken taste amazing.
 After everyone ate it was time to start the firework show.. I should have guessed  that with hosting duties come firework responsibility.  Between my husband and a buddy of his, they were able to put on a pretty decent show.  I wasn't too thrilled about him being partly responsible of the fireworks, but
I could tell that he was very excited about it.  There were a couple times during the lighting that couple fireworks exploded before they took off into the air.. I thought that I was going to see my husband running around in flames after that, but luckily there was no such thing.  Once the show was over I felt like I could breathe again.  I can honestly say that I love firework shows, but not when being done by my husband..


Friday, July 1, 2011

Thank goodness for Facebook...


There are several reasons as to why I love facebook.. Not only is it a good way to keep up with people I havent seen since high school and even middle school, but it serves as a great reminder for important dates... like birthdays and even my wedding anniversary... Yes, I'm serious.  I was doing the daily "facebook check-in" on Monday when I saw up in the corner a little announcement telling me that this Friday was my wedding anniversary.  I don't know if I would have forgotten about it completely, but with planning a 4th of July party and keeping up with my etsy orders (which can be found here) :), I probably would not have remembered until the day before.  Whew... I wonder if my hubby would have remembered as well.. Oh well... i guess we will never know... but seriously... thank goodness for facebook!  Oh, and Happy Anniversay Baby! 

Thursday, June 30, 2011

I'm Back in action...

So I know i've been MIA for a really long time... But believe me, I have thought about returning for a while. Having two little girls under the age of 4 really keeps me busy and ALWAYS up to something.  Lately I have had a lot more of a desire to blog all the ideas I have had in my head.. Its actually a great way for me to keep track of what I want to do around here... I guess I can look at it as my place for organized chaos. My ideas change daily, so hopefully by putting them all in one place I wont change my mind as often.... But I doubt that.

Just recently I was able to finally convince my husband to paint our house.. It has taken almost 2 years, but we finally did it!! He agrees that paint really does make a HUGE difference in not only the appearance of  the house, but also the "vibe".  He loves how "warm" it feels, and I completely agree. But aside from having this "warm" feeling, I am excited that I do not have to see greasy little finger prints all over the flat paint that we had on the walls before.  I can now actually clean the walls without worrying about a section of paint coming off. Wahoo! (its the small things that excite me).
    Now that the painting is done, I have "design fever"... I now want new furniture, new wall decor as well as new landscaping... yes, I know.. I need to slow down.  As my hubby tells me I just need to relax...I guess I'll just focus on the inside of my house first.  The landscaping can wait.. I'll jsut have to keep all my blinds closed so i don't have to see the lack of flowers and trees that are out there. I guess it can wait until next year

Here are some before and after pictures of our house.... keep in mind not all of the decor is back up on the walls.. this is just to show what a difference paint color can make. 
Before w/ Flat paint
Sherwin Williams Antique White

After
Sherwin Williams:  Dapper Tan


Before
Sherwin Willimas: Antique White

 After
Benjamin Moore: Providence Olive


Before
Sherwin Williams:  Antique White

 After
Behr: Garden Wall

 Foyer with paint
Sherwin Williams: Ramie (lighter color)
Sherwin Williams: Dapper Tan (Dining Room)


Saturday, August 14, 2010

"Hutch- Bookshelf Project" was a success!

Now that I am getting back into my little "blogging world" I have been looking around for new inspiration for DIY home projects... While searching around one day I stumbled upon these blogs "Posh Pieces" and "Ucreate". .. Such great blogs! It has triggered my new interest of buying old furniture and sprucing it up a bit to make it look like new again.


My Inspiration:

I LOVED that you could turn that old hutch (above) into something so cool (below)!

My Process:
I went to the GoodWill where I found this old hutch for $30.00.. I was really back and forth on whether I should get it, but I thought "why not".... I got the idea to turn it upside down and board up the top to turn it into a book shelf with toy storage on the bottom...

After of about a week of working on the "hutch-bookshelf project" I finally finished!! I am extremely happy with myself for actually accomplishing something so great for about $50.00. There are a few things that I will do differently next time, like not paint 80% humidity, but overall I must say I am satisfied with how my new hutch-into-bookshelf project turned out. (pictures coming soon!), but until then here are a few pictures of the process...


The first obstacle that I came across while making my bookshelf was that I bought nails that were too long, so as I was nailing them in they would bend up... Next time I'll get some half the size.

With some wood filler I patched up the areas where  the nails went in on top and other areas that needed to be smoothed out  a bit.  I finished it off by smoothing out the areas with some 300ct sand paper. 

I ended up not replacing the back panel.  I figured if I ever wanted to plug anything in I'd have those holes to run the electrical cord through.  Now that it's painted black those holes are not as noticeable. 

And here it is.... All finished!!


The Next Step:  Make bins to fit inside

I saw this project while browsing through the blog "Make it and Love It".  I really liked the idea of making my own bins out of cardboard.  I have tons of boxes from our semi-recent move...and cute material from some old sewing projects.. This looks like a cinch and they are super cute!
Here are the steps featured on her blog:


First, gather some old cardboard boxes.

(Try to collect some sturdier boxes so that you don't have to glue many layers together to make your storage boxes sturdier.)
Decide how many boxes you want and cut enough for all of the sides of your boxes. I am giving directions for boxes that are 10 inches tall by 10 inches wide and 11 inches deep. These are perfect for my shelves.....but adjust for your own shelves.

Here are the pieces for one box.

The bottom piece is 10 x 9 inches, the two side pieces are 11 x 10 inches, and the front and back pieces are 10 x 9 inches.....with a 1.5 x 3 inch opening on the front piece. Each piece is 1/2 inch thick and are two pieces of cardboard thick......for added strength.

To assemble, I glued (with the hottest setting on my glue gun) the bottom piece to the inside bottoms of the front and back piece.


See from the bottom how the bottom piece is glued to the inside of the front and back piece?

Then glue that section to the inside of the side pieces.......so the side pieces cover everything and all of the raw edges. You will be surprised at how study this new little box is.

Next, I spray painted the sides and upper edges white. You can leave your boxes brown or alter them with spray paint if you'd like. You can also spray paint the inside/back/bottom but I didn't bother.....because they aren't really seen.


Then I applied a moderate layer or Mod Podge to the front section of the box...


And then placed a slightly bigger piece of fabric over top...and smoothed it all out.


Then I made slits in the fabric, where the opening is on the front of the box.
Then I folded those pieces over while applying more Mod Podge.


After the Mod Podge underneath was dry, I trimmed off the edges.....


.......and then applied another layer (pretty thick) of Mod Podge over the top.....making sure to Mod Podge all of the raw edges of fabric and pressing them firmly against the box.
Allow to dry completely......

And that's it.

Your boxes are ready to be filled.....

...and the clutter organized.


Monday, August 9, 2010

Living Room Ideas

For some reason I have had a hard time coming up with something to do to my living room.. You'd think the one room that matters most in the house I would have focused all my time and energy into, but that's not the case.  I think because it is the room that everyone sees, I can't make my mind up as to what I want to do.. there are so many ideas, so many color schemes, that I know once I choose one I am bound to change my mind..
Here is a quick sketch as to what I would like to do to the living room.. the walls next to the fireplace seem so empty.  I would ultimately love to build some bookselves on either side, but for economic reasons I think shelves would be the way to go. What do you guys think?  Any other ideas?
This is the "look" I am going for... I know I'm far from it, but slowly getting there... Next would have to be color on the walls.

Thursday, February 18, 2010

Start Your Own Organic Garden

Here is a link to a site I came across while looking for information on  starting your own organic Garden.. I found it to be pretty helpful and there was some other interesting information on there...

Start Your Own Organic Garden


 I hope that in the spring I can pull this off... at least i'm doing the research now ;)  wish me luck!

Tuesday, February 16, 2010

Organic Garden...

I really really really want to build and plant an organic garden in my back yard this spring.  It is something that I have been wanting to do for a long time, but just never got around to it.  At one point I actually built my own compost, but had nothing to put my fresh organic soil into. It was a waste.  But now that I know how to do the compost portion of it, I thought that I would at least try to see if I can maintain my own little garden... I love the idea of going out into my back yard and picking fresh herbs and veggies to feed my family.
There are so many health benefits to veggies in general, but making sure that I'm not consuming pesticides, or other harmful products makes growing an organic garden so appealing to me.  Take a look at this website which talks about health benefits of organic foods... yummmy!

I recently came across this video on building your own raised garden bed , and it actually looks like something that I can do...


Monday, February 15, 2010

To Feng Shui or not to Feng Shui?...

So not sure why, but recently I have been turned on to the idea of fueng shui-ing my home.... I think it might be brought on by the idea of a new year, a new me, new ideas, new house etc ... I thought it be worth putting some things in place especially since I am currently in the process of totally decorating our new home... How do you all feel about this concept?   Do you think it works? I am hoping that it will be able to balance out the energy in my life a little more especially since lately it has been a little crazy around here. ;)

This is what I've learned about Fueng-Shui so far...

Feng Shui is an ancient art and science developed over 3,000 years ago in China that reveals how to balance the energies of any given space to assure the health and good fortune for people inhabiting it.

"Feng" means wind and "Shui" means water. In Chinese culture wind and water are associated with good health, thus good feng shui came to mean good fortune, while bad feng shui means bad luck, or misfortune.

There is a lot that has to do with Fuen- Shui.  You first must determine the Bagua, which is used to analyze the energy in any given space... From there you can start "Fueng-Shuing" your home to promote only good energies....
 
Whew... that was a lot to take in, but Fueng-Shui really has a lot to do with interrior decorating and what colors should be placed in each room in order to promote good energies.
 

Gotta love these colors

As I do on a regular basis, I was browsing through some photos online and I came across yet another set of gorgeous ideas that I loved for my house.  I liked the neutrals that were used in this house, and wish that my house could look something like this...
I love the simple photos that were used here.  I love this idea for my stair case.

Simply beautiful...but not kid-friendly ;(

Friday, February 5, 2010

I had to share this....

This is the site of one of my favorite blogspots that I had to share with everyone.  It has given me so many ideas for decorating my children's rooms, and I think that every mom out there will love it as well.  Check it out...This really had my immagination going...  Enjoy! 

Design Dazzle
Below is one of my favorite rooms, and I used the color scheme for my daughter's own room. 
I love the muted pinks and greens together...so beautiful and delicate.

I love the details on the walls that make it look so girly. Not sure If I could pull this off in my little girls room because I know that she would not leave them haninging on the wall. 
What a beautiful Chandelier!  Really adds so much to the room to swap out an old light fixture with a different one.