
My Inspiration:

I LOVED that you could turn that old hutch (above) into something so cool (below)!
I went to the GoodWill where I found this old hutch for $30.00.. I was really back and forth on whether I should get it, but I thought "why not".... I got the idea to turn it upside down and board up the top to turn it into a book shelf with toy storage on the bottom...
After of about a week of working on the "hutch-bookshelf project" I finally finished!! I am extremely happy with myself for actually accomplishing something so great for about $50.00. There are a few things that I will do differently next time, like not paint 80% humidity, but overall I must say I am satisfied with how my new hutch-into-bookshelf project turned out. (pictures coming soon!), but until then here are a few pictures of the process...

The first obstacle that I came across while making my bookshelf was that I bought nails that were too long, so as I was nailing them in they would bend up... Next time I'll get some half the size.

With some wood filler I patched up the areas where the nails went in on top and other areas that needed to be smoothed out a bit. I finished it off by smoothing out the areas with some 300ct sand paper.

I ended up not replacing the back panel. I figured if I ever wanted to plug anything in I'd have those holes to run the electrical cord through. Now that it's painted black those holes are not as noticeable.
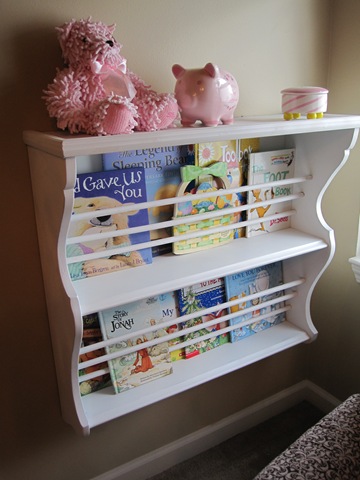
And here it is.... All finished!!

The Next Step: Make bins to fit inside
I saw this project while browsing through the blog "Make it and Love It". I really liked the idea of making my own bins out of cardboard. I have tons of boxes from our semi-recent move...and cute material from some old sewing projects.. This looks like a cinch and they are super cute!
Here are the steps featured on her blog:

First, gather some old cardboard boxes.
(Try to collect some sturdier boxes so that you don't have to glue many layers together to make your storage boxes sturdier.)
Decide how many boxes you want and cut enough for all of the sides of your boxes. I am giving directions for boxes that are 10 inches tall by 10 inches wide and 11 inches deep. These are perfect for my shelves.....but adjust for your own shelves.
Here are the pieces for one box.

The bottom piece is 10 x 9 inches, the two side pieces are 11 x 10 inches, and the front and back pieces are 10 x 9 inches.....with a 1.5 x 3 inch opening on the front piece. Each piece is 1/2 inch thick and are two pieces of cardboard thick......for added strength.

See from the bottom how the bottom piece is glued to the inside of the front and back piece?
Then glue that section to the inside of the side pieces.......so the side pieces cover everything and all of the raw edges. You will be surprised at how study this new little box is.


Then I applied a moderate layer or Mod Podge to the front section of the box...

And then placed a slightly bigger piece of fabric over top...and smoothed it all out.

Then I made slits in the fabric, where the opening is on the front of the box.
Then I folded those pieces over while applying more Mod Podge.
After the Mod Podge underneath was dry, I trimmed off the edges.....

.......and then applied another layer (pretty thick) of Mod Podge over the top.....making sure to Mod Podge all of the raw edges of fabric and pressing them firmly against the box.

Allow to dry completely......
And that's it.
Your boxes are ready to be filled.....
...and the clutter organized.


No comments:
Post a Comment